

FastAPI is a modern, fast (high-performance), web framework for building APIs with Python 3.6+ based on standard Python type hints.
Key features of FastAPI include:
- Fast: Very high performance, on par with NodeJS and Go (thanks to Starlette and Pydantic). One of the fastest Python frameworks available.
- Fast to code: Increase the speed to develop features by about 200% to 300%.
- Fewer bugs: Reduce about 40% of human (developer) induced errors.
- Intuitive: Great editor support. Completion everywhere. Less time debugging.
- Easy: Designed to be easy to use and learn. Less time reading docs.
- Short: Minimize code duplication. Multiple features from each parameter declaration. Fewer bugs.
- Robust: Get production-ready code. With automatic interactive documentation.
- Standards-based: Based on (and fully compatible with) the open standards for APIs: OpenAPI (previously known as Swagger) and JSON Schema.
- Django-friendly: Can work with Django to handle more complex web applications that require user management, databases, regular HTML templates, etc.
- Flexible: FastAPI rests upon Starlette for the web parts and Pydantic for the data parts. Both of these are very flexible and highly customizable.
FastAPI provides automatic generation of API documentation (with the Swagger UI and ReDoc), thanks to the use of the OpenAPI standard.
It also includes support for background tasks, handling cookies and form data, request validation using Pydantic, dependency injection, and much more.

In our last blog post, we explained how to back up your application using Git with GitHub. The next step is to deploy it to DigitalOcean using App Platform in order to complete the workflow.
After pushing your code, navigate to https://cloud.digitalocean.com/apps and click on Create App.
You'll be asked to link your GitHub account. Authorize this connection and permit DigitalOcean to access your code repositories. You have the flexibility to allow access to all your repositories or limit it to specific ones that you plan to deploy.
Select Install and Authorize to go back to your DigitalOcean dashboard and proceed with your app creation.
Within the Repository section, choose your_account/your-app repository from the dropdown list. Identify your branch name and source directory. Decide if you want to turn on autoscaling, and then click on Next.
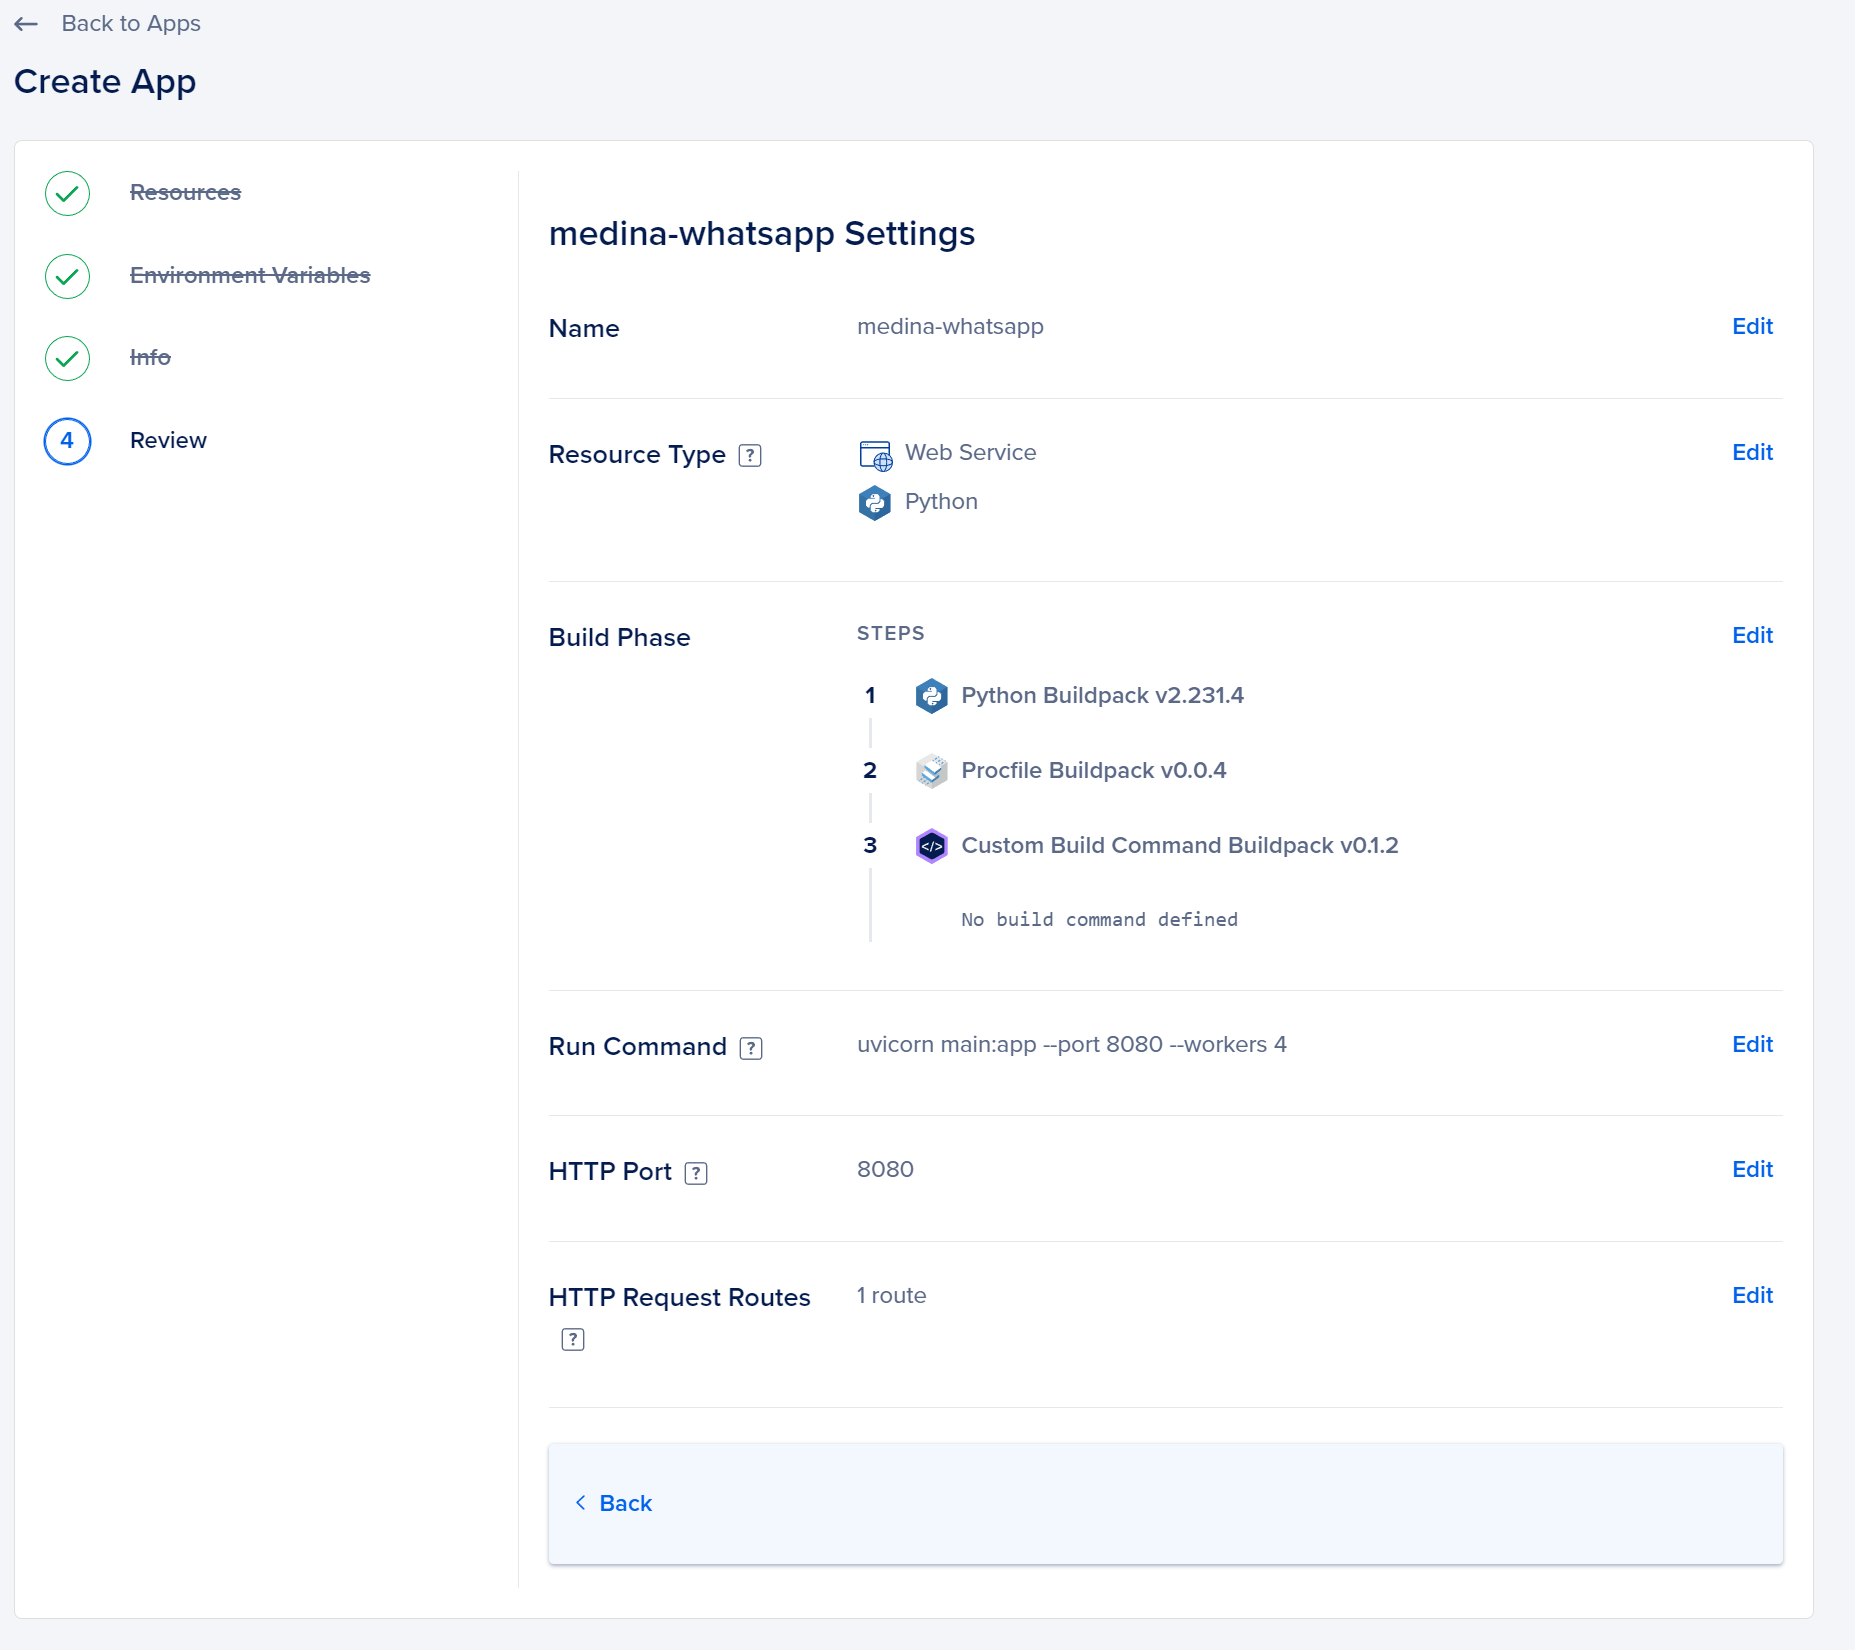
DigitalOcean will identify your project as a Python application and will automatically fill in a partial run command.
When you connect your repository and it detects a Python application (often by detecting specific files like requirements.txt or Pipfile), DigitalOcean's App Platform tries to auto-configure certain settings for the deployment, which includes generating a partial run command.

This "partial run command" is essentially a suggestion or an automatically generated command that DigitalOcean believes is the most appropriate for running your Python app. For many standard web applications, it might be something like gunicorn myapp:app for a Flask or FastAPI application or gunicorn myproject.wsgi:application for a Django project if you're using Gunicorn as your WSGI server.
However, this auto-generated run command might not always be accurate or optimal for your specific application, especially if it has custom configurations or requires special startup commands. It's recommended to verify this command and adjust it if necessary to ensure your app starts and runs as intended.
Find the command that works perfectly for the FastAPI app we developed as follow:
Technical Note: Usually, you should use something called Procfile, a mechanism for declaring what commands are run by your application's containers on the Platform as a Service (PaaS) provider, Heroku.
The Procfile is always named with a capital "P" and contains no file extension. It is used to explicitly declare the various process types in an application, like web, worker, etc.
The primary motivation behind using a Procfile is to guide the platform on how to run the components of a web application or service. When you deploy an application to Heroku or similar platforms that recognize the Procfile, it reads this file to determine how to run your application.
A simple Procfile might look something like this:
worker: python worker.py
In this example:
- The
webprocess type indicates the command to run to start the web server for the application (using Gunicorn in this case). - The
workerprocess type could be a background worker process, and it's instructed to run theworker.pyscript.
Here's a brief breakdown:
web: This is a special process type in Heroku's context. It's the only process type that can receive external HTTP traffic from Heroku's routers. If your application has a web front-end, it should be declared as thewebprocess.worker: This denotes a background process. It could be a queue consumer, a custom script you want to run, or any other task that you want to run in the background.
The Procfile can contain other process types as well, depending on your application's needs.
Remember, while Procfile originated with Heroku, its concept has been adopted by some other platforms and tools as a way to declare processes, so you might encounter it in contexts other than just Heroku deployments.

Environment variables for your apps
DigitalOcean's App Platform allows you to use environment variables for your apps. These environment variables can store configuration settings, secret keys, database URLs, and more. Declaring and managing environment variables is straightforward on the App Platform.
Here's how you can declare environment variables on DigitalOcean's App Platform:
Dashboard:
- Navigate to your DigitalOcean Control Panel and select the specific app you're working on.
- In the left sidebar, under the "Settings" section, you'll find an option labeled "Environment Variables". Click on it.
- Here, you can add new environment variables by specifying the variable
Nameand itsValue. - Once added, you can also modify or delete these variables if needed.
During Deployment:
- When you're deploying an app using the DigitalOcean App Platform interface, during the app configuration steps, there's a section called "Environment Variables" (usually after you've selected the repository and branch).
- Here, you can add environment variables which will be available for your app once deployed.
YAML Configuration (For More Advanced Users):
- If you're using the
doctlcommand-line interface or deploying via the API, you can define environment variables in the app specification YAML file. - Within this file, under the service, job, or static site specification, you can add an
environmentsection and list out the variables.
Example YAML snippet:
envs:
- key: DB_USER
scope: RUN_AND_BUILD_TIME
type: SECRET
value:EV
A few things to remember:
- Sensitive Information: If you're storing sensitive information, such as API keys or passwords, make sure you treat them securely. The App Platform offers encrypted environment variables for this purpose.
- Application Restart: When you update an environment variable, you typically need to restart the associated service or component to pick up the change.
- Local Development: Ensure you have a mechanism to use these environment variables during local development, perhaps by using a
.envfile or other local environment management tools.
Always refer to the official DigitalOcean documentation for the most up-to-date information, as the platform and its features can evolve over time.

Common pitfalls
During our numerous builds and deployments, we experienced a bunch of issues and errors that we will try to enumerate as follow
- HTTP Serving on
localhostvs0.0.0.0
HTTP servers explicitly running on localhost or 127.0.0.1 creates a common issue. This is problematic because localhost is an alias for 127.0.0.1, which is a local loopback interface that is not externally exposed to the current environment.
HTTP servers should not include an address specifying 0.0.0.0 explicitly, or using the process.env.PORT.
2. TypeError: FastAPI.call()
The error TypeError: FastAPI.__call__() missing 1 required positional argument: 'send' is typically seen when there's an attempt to directly call an instance of the FastAPI application as if it were a synchronous function. This can arise from several potential mistakes in how you're setting up or running your FastAPI application.
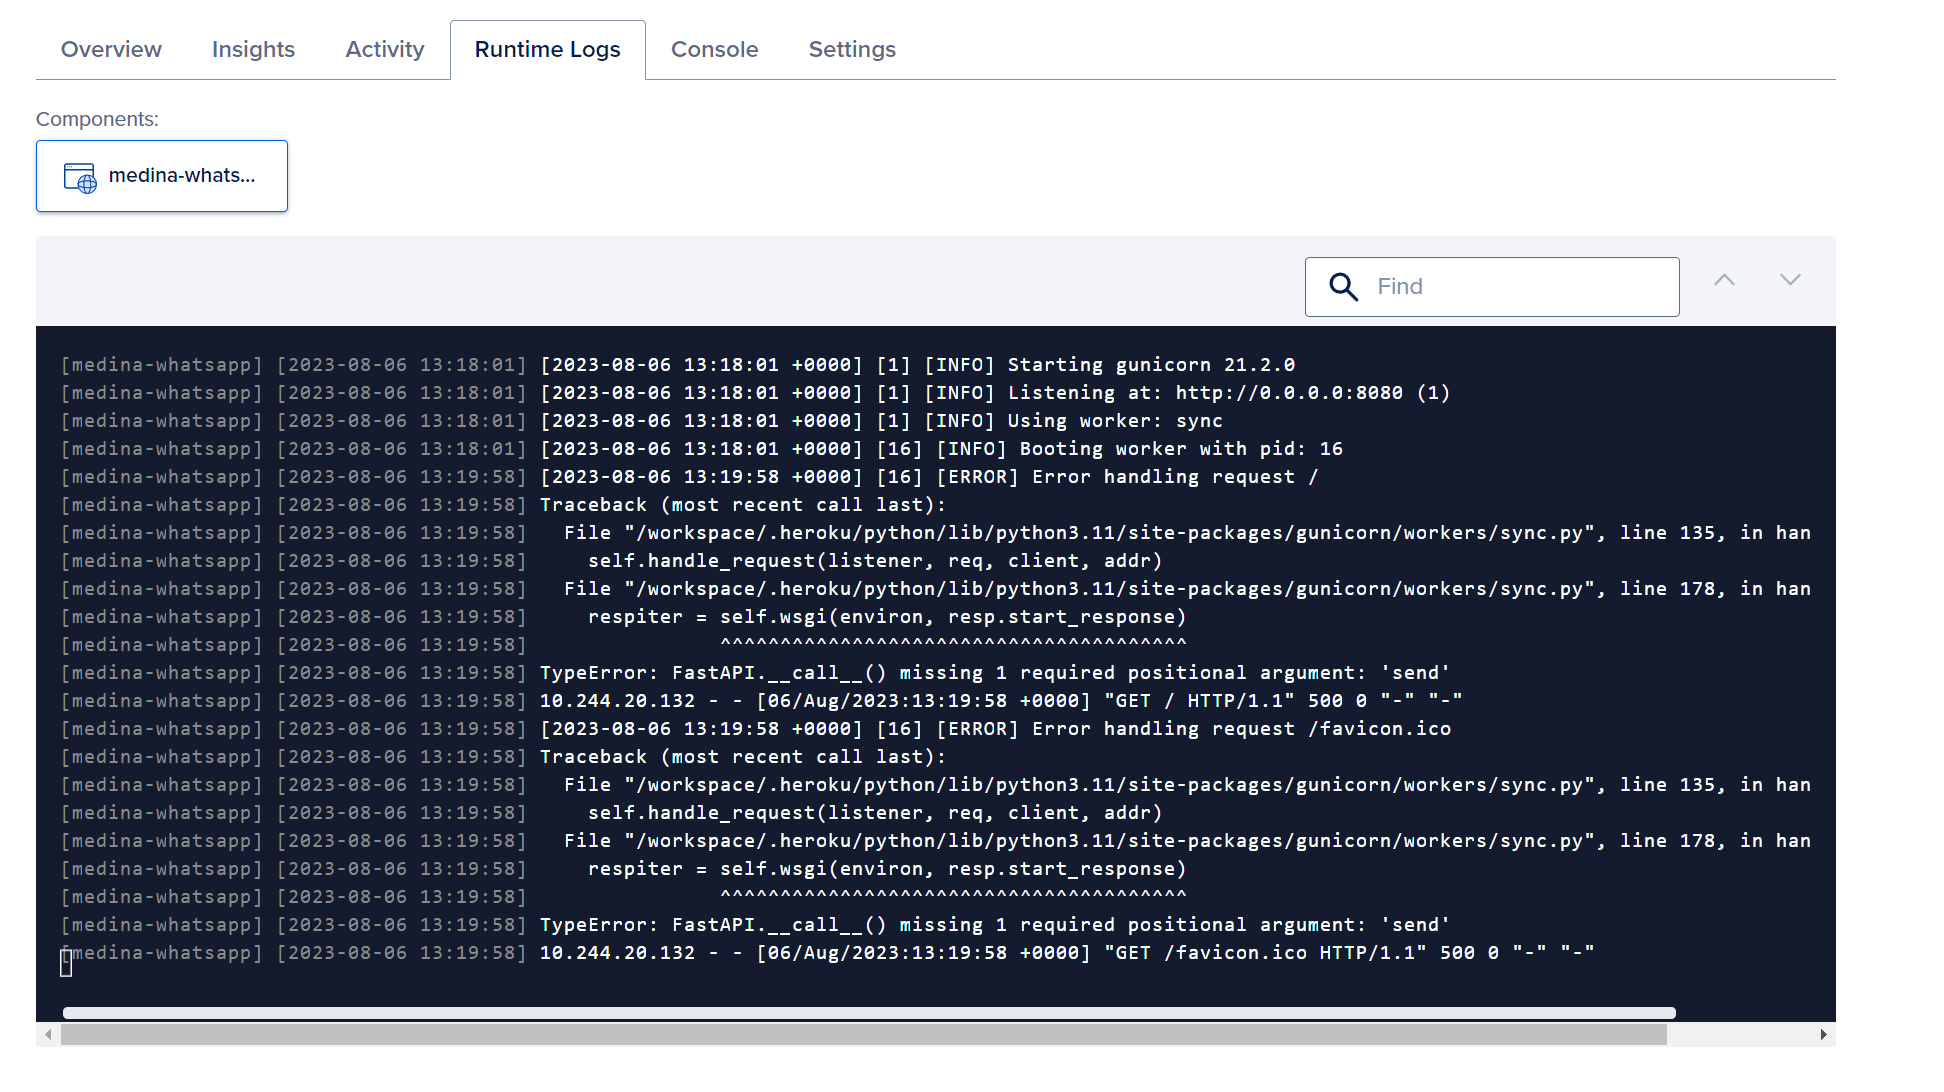
FastAPI apps are ASGI applications, meaning they're designed to be asynchronous and to be invoked by an ASGI server, like Uvicorn, Hypercorn, or Daphne.
Follow the syntax for Gunicorn as below :
3. HTTP Port configuration
Some apps set the listening port using the PORT environment variable, while others are hardcoded. In the scenario that an app uses PORT to determine the HTTP server port, the HTTP Port field in app’s Settings tab overwrites any PORT environment variables that are set in the app.
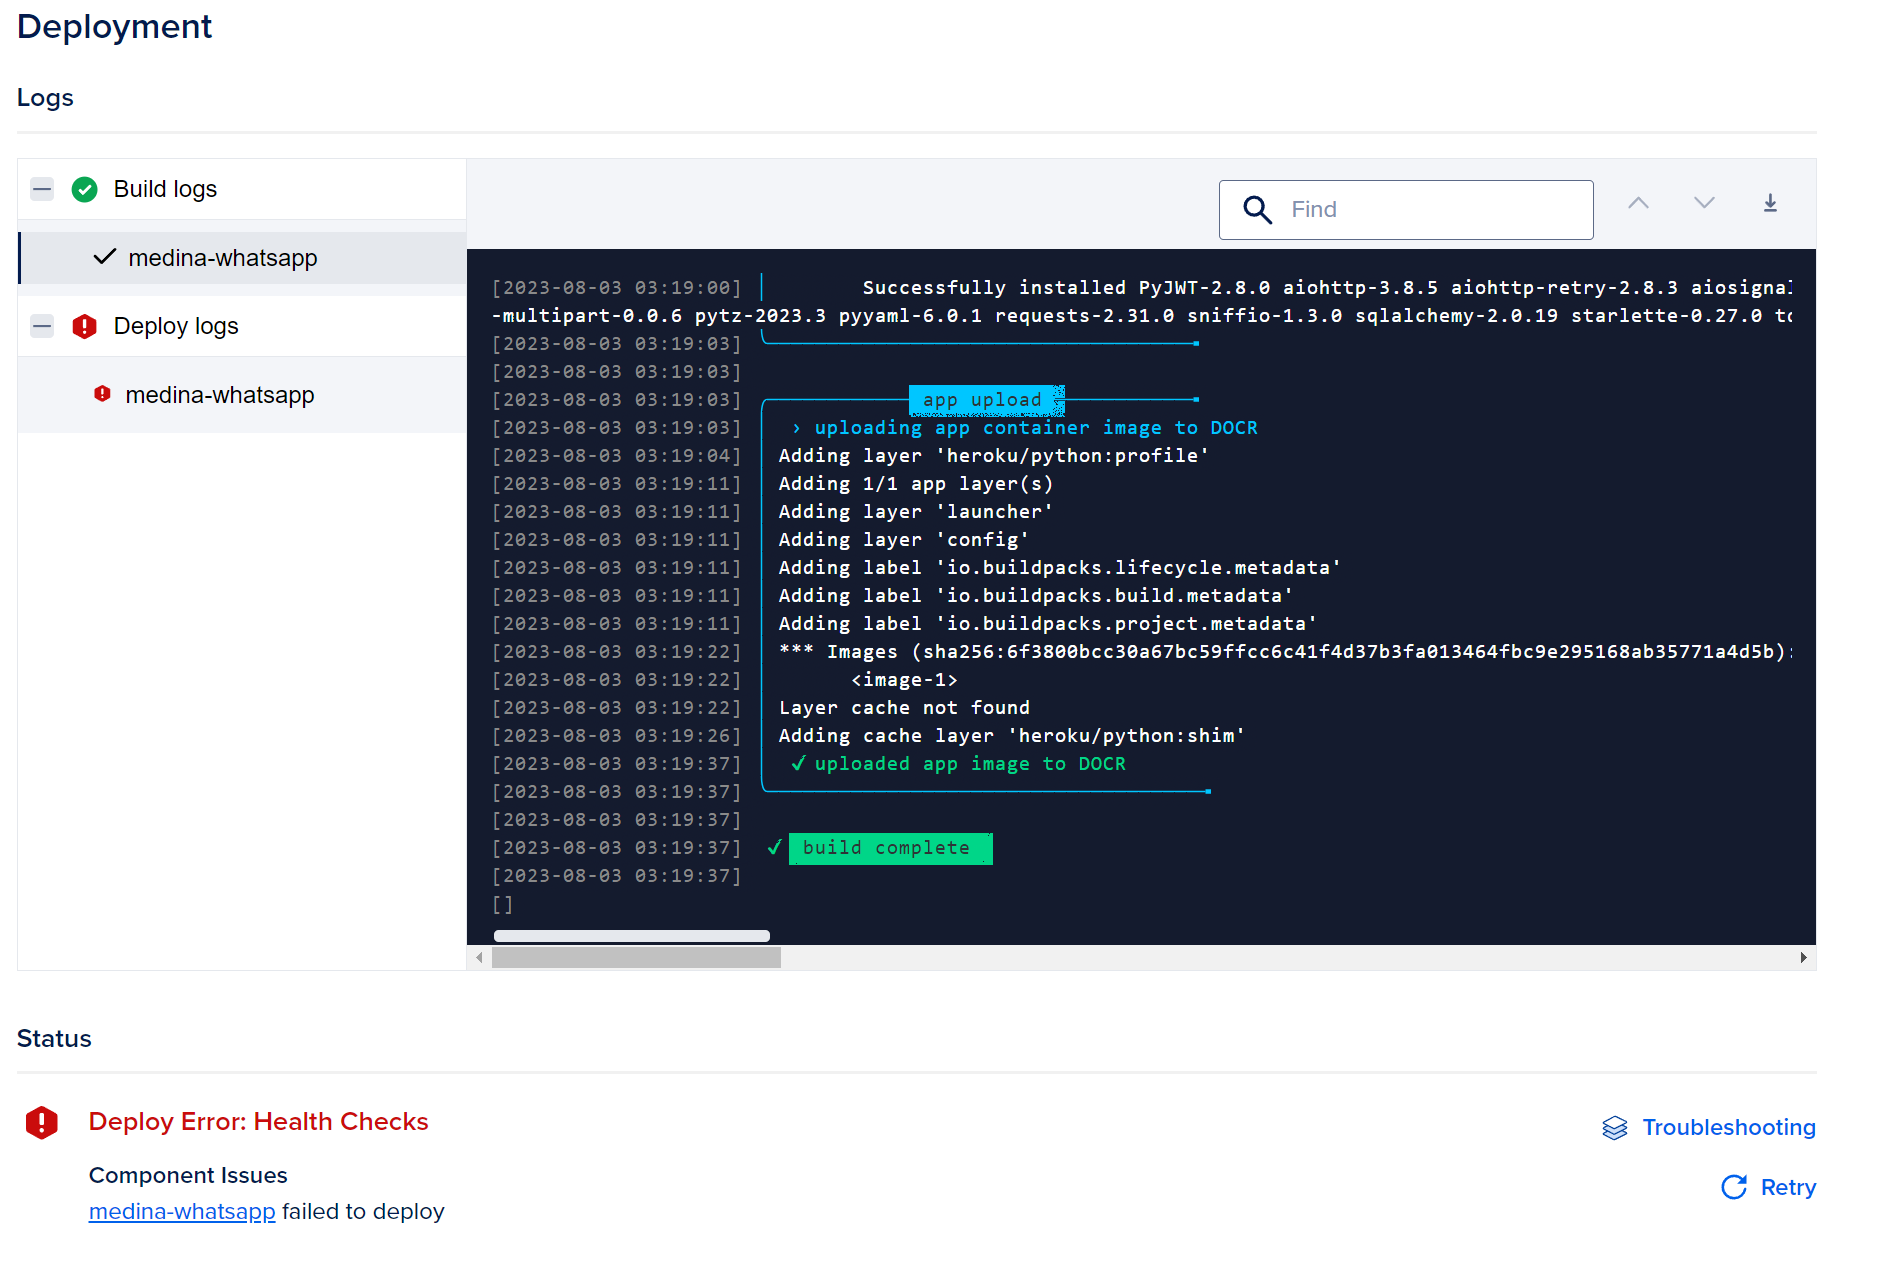
If an app’s HTTP port is hardcoded, the HTTP Port for that component needs to be changed in the Settings tab to match the app’s value.
In order to use the appropriate version of the run command, please refer to 2. above and ensure you're not using values that aren't recognized by Digital Ocean or it will cause multiple issues alongside your build and deployment.
4. Uvicorn with Workers
In the context of Uvicorn and many other web servers, the term "workers" refers to the number of separate process instances of the server that are run simultaneously. Each worker is a separate process that handles incoming HTTP requests.
Using multiple workers can help in maximizing the usage of multiple CPU cores, leading to a potential increase in the overall throughput of the application, especially for CPU-bound tasks. This is because a single process will run in a single core, so by having multiple processes (workers), you can utilize multiple cores of the machine.
When you run Uvicorn with multiple workers, it's essentially leveraging the Gunicorn server to manage these multiple Uvicorn instances. Uvicorn by itself is a single-process ASGI server, but when paired with Gunicorn, it can be run in multiple processes.
Here's how you might run a FastAPI application with Uvicorn using multiple workers:
Here:
-w 4: This means Gunicorn will start 4 worker processes.-k uvicorn.workers.UvicornWorker: This tells Gunicorn to use the Uvicorn worker class.myapp:app: Points to the FastAPI application instance (assuming it's defined inmyapp.py).
A few things to keep in mind:
- Memory: Each worker is a separate process, meaning each will have its own memory allocation. This is a contrast to threading, where threads share the same memory space.
- State: Because each worker is a separate process, maintaining shared state between them can be challenging. If your application relies on in-memory state (like counters or caches), each worker will have its own version of that state. For shared state, you'd typically rely on external systems, like databases or caching servers.
- Concurrency within Workers: While each worker handles requests in its process, the asynchronous nature of Uvicorn (and ASGI apps in general) means that a single worker can still handle multiple requests concurrently using async I/O. This is especially useful for I/O-bound tasks.
- Tuning: The optimal number of workers can depend on the nature of your application and your server's specifications. It's often a good idea to start with a number of workers equal to the number of CPU cores and adjust based on actual workload and performance metrics.
In summary, workers in the context of Uvicorn (and Gunicorn) allow you to run multiple processes of your ASGI application to better utilize available CPU cores and potentially handle more requests in parallel.


Member discussion