

It is simple to learn, has a tiny footprint with lightning-fast performance, and offers features such as cheap local branching, convenient staging areas, and multiple workflows.
When working on a project, particularly in a team setting, it's crucial to manage and keep track of the changes in your codebase. This is where Git comes into play. It records your codebase's history, making it easy to review, revert, or merge changes, and synchronize code across multiple teams.

In simpler terms, when we use a tool like Git, it's like storing our work project on the internet to keep it updated with the latest changes. This applies to both private or public projects. Anybody who has been given permission to work on this project can make a copy of it, install it, and help make it better.
This is why this way of updating a project, known as versioning, is liked a lot by big teams. But, there's more! Every project should be protected and should follow the right way of doing things.

How Git works basically
Git is a distributed version control system used for tracking changes in source code during software development. It's designed to handle everything from small to very large projects with speed and efficiency. Here's a simple explanation of how it works:
- Repository Creation: A Git project starts by creating a repository or 'repo' for your project. This is a dedicated folder where all the files, history, and versions of your project are stored. You can create a new repository on your local machine or clone an existing repository from a remote server (like GitHub).
- Working Directory and Staging Area: When you're working on a project, you make changes in your working directory. When you're ready to save these changes, you move them to a 'staging area'. This is like a draft space where you gather your changes before committing them to the project history.
- Commits: Once you're happy with the changes in your staging area, you 'commit' them. A commit is a snapshot of your project at a particular point in time. Git keeps a record of what changes were made in each commit, who made them, and why (based on a message you provide when you commit).
- Branches: Git allows you to make branches in your project. A branch is a separate line of development. This means you can work on different parts of your project simultaneously without affecting the main project. Once you're happy with your work on a branch, you can 'merge' it back into the main project.
- Remote Repositories: Git also allows you to sync your local repository with 'remote' repositories. This means you can work on a project locally, then push your commits to a remote repository (like GitHub). This is particularly useful for collaborating with others. They can pull your changes from the remote repository to their local one, make their own changes, and push them back to the remote.
- Pull Requests: If you're working in a team and you want to merge your changes into the main project, you can create a 'pull request'. This is a way of saying "I've finished my work and I think it's ready to be merged in". Your team can review the changes before deciding to merge them.
So, Git is essentially a powerful tool for managing project versions, collaborating with others, and keeping a detailed history of your work.

Your repository
To create a new repository on GitHub.com, you need to follow these steps:
- Sign in to GitHub: If you don't have an account, you'll need to create one.
- Create a new repository: Once you're signed in, click the '+' icon in the upper-right corner of the GitHub homepage, then select 'New repository'.
- Choose a name for your repository: In the 'Repository name' field, choose a name for your repository. You can also add an optional description in the 'Description' field.
- Set repository visibility: Select whether you want the repository to be public (visible to everyone) or private (only visible to people you choose).
- Initialize the repository: If you're starting a new project from scratch, you might want to initialize the repository with a README, which is a document that typically contains information about the project such as its purpose and how to install and use it. You can do this by checking the box next to 'Initialize this repository with a README'. If you don't need a README or you're planning to push an existing project to this repository, you can leave this box unchecked.
- Click 'Create repository': Once you're happy with your settings, click the 'Create repository' button.
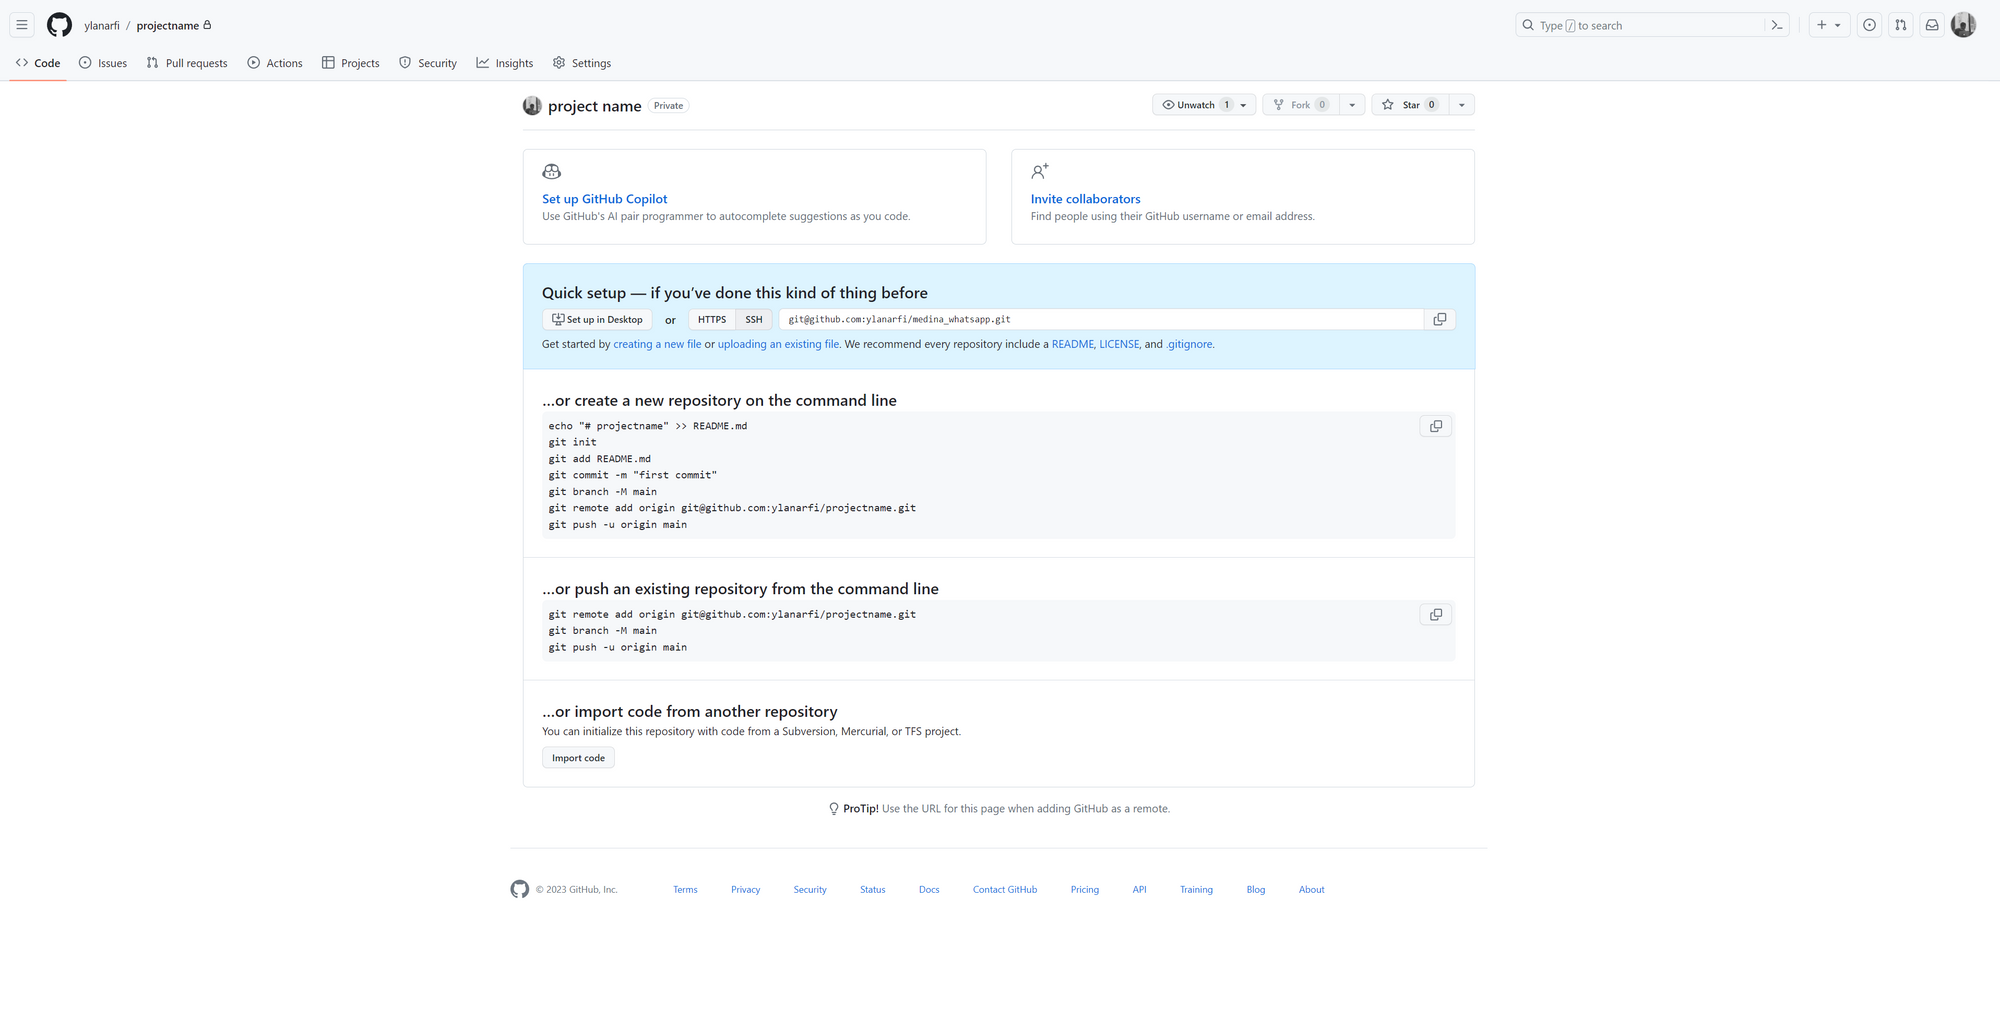
After you've clicked 'Create repository', GitHub will take you to your new repository's main page. From here, you can clone the repository, push an existing project to it, add new files, and more. On the repository's main page, you'll also find the URL you'll need to link your local project to this repository, which is needed for the 'git remote add' command.
Write your best README.md
Writing a good README file is essential because it gives others a comprehensive understanding of your project, its purpose, how to install and use it, and more. Below are some elements you should include to create a solid README file:
- Project Title: The title of your project should be clear and concise.
- Description: Provide a brief explanation of what your project does and why it exists. This is where you would highlight the problems your project solves or the functionalities it provides.
- Installation Instructions: Give clear, step-by-step instructions on how to set up your project. This could include commands to clone your repository, install dependencies, or build your project.
- Usage: Explain how to use your project once it's installed. Provide examples or even screenshots/gifs if your project has a user interface.
- Contribution Guidelines: If you are open to contributions, explain how others can contribute. This may include instructions for creating issues, forking the project, creating pull requests, and any code style preferences.
- License Information: Include details about the license your project uses, if any.
- Contact Information: Provide a way for others to contact you with questions, comments, or suggestions.
Here's an example of what this might look like in a README.md:
Project Title
Description
A brief description of what this project does and why it was created.
Installation
- Clone the repo:
git clone https://github.com/username/repo.git - Install dependencies:
npm install - Build the project:
npm run build
Usage
Explain how to use the project. Provide examples or screenshots/gifs if necessary.
Contributing
- Fork the project
- Create your feature branch (
git checkout -b feature/AmazingFeature) - Commit your changes (
git commit -m 'Add some AmazingFeature') - Push to the branch (
git push origin feature/AmazingFeature) - Open a Pull Request
License
Distributed under the MIT License. See LICENSE for more information.
Contact
Your Name - your@email.com
Project Link: https://github.com/your_username/repo_name
Remember, a good README is always evolving. As your project changes, don't forget to keep your README up to date!

Liking local project to a repository using Git
Linking a local project to a repository using Git involves a few steps. Here's how you can do it:
Initialize Git in your local project: Open your terminal or command prompt, navigate to your project folder using the 'cd' command. Once you're in the project folder, initialize Git by typing the following command:
This command creates a new Git repository in your project. It's now ready to track changes.
Create .gitignore file: The .gitignore file is a text file that tells Git which files or directories to ignore in a project.
A few use-cases where .gitignore is useful:
- System Files: Operating systems generate files that aren't needed in the git repository. For example, thumbnail cache files like
.DS_Storein Mac OS, orThumbs.dbin Windows. - Application Files: Some applications generate temporary files that should not be stored in a git repository. For example, the
.pycfiles in Python, or.classfiles in Java. - Log Files: If your application generates log files, these can change every time you run your app, and you might not want to keep them under version control.
- Environment Files: Files like
.envwhich might contain sensitive data (API keys, passwords) should not be pushed to public repositories. You can add these to.gitignoreto ensure they are not accidentally committed. - Dependencies: If your dependencies (external libraries, packages) are installed locally in your project, they can be ignored as well because they can be installed through a package manager.
- Build Files: Files/folders that are generated as a result of a build (like
dist/,build/directories) should also be ignored as they are generated from your source code and don't need to be stored in version control.
Adding files to a .gitignore file in your project's root directory allows you to keep your repository clean and organized and prevents unnecessary files from being committed. A properly set up .gitignore is an important part of good repository management.

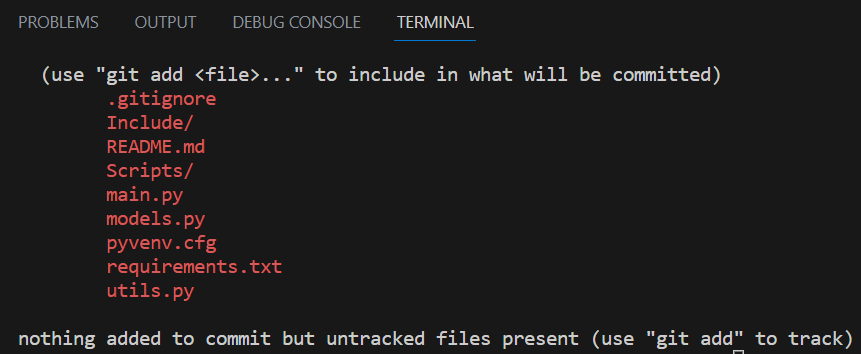
Git status command: The git status command in Git is used to display the state of the repository and working directory. It shows you which changes have been staged, which haven't, and which files aren't being tracked by Git. This can be helpful to understand what will be included in the next commit.
Here's what the git status command shows:
- Untracked files: These are files that exist in the directory, but have not been added to the repository database. In other words, Git doesn't know about them (yet).
- Changes not staged for commit: These are modified files that have not been prepared to be committed.
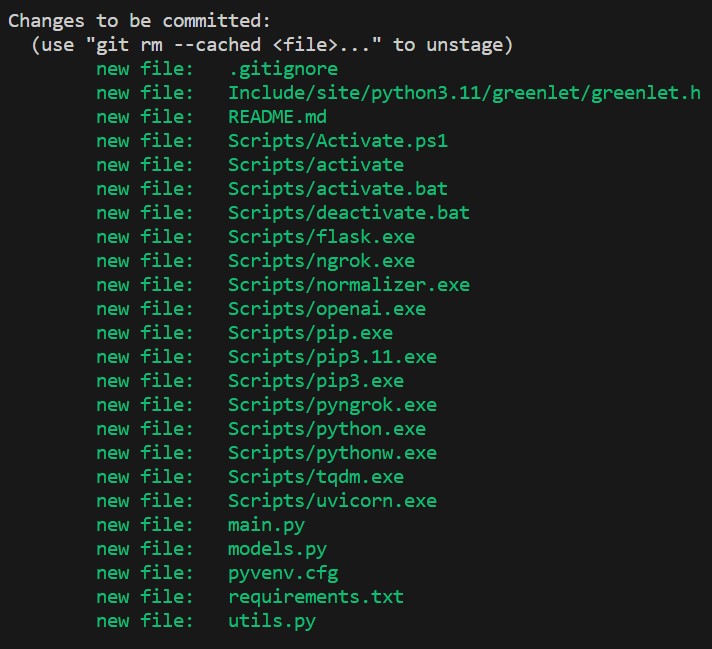
- Changes to be committed: These are the changes that have been added to the staging area and are ready to be committed to the repository.
By running git status, you get a report of the state of your current working directory and the staging area. It's a good practice to run git status before making a commit so you can see what changes will be included in the commit. This can help you avoid committing changes unintentionally.
Add files to the repository: You can add one file at a time using the 'git add [file-name]' command, or add all files at once using the 'git add .' command. Here's how you can add all files:
Author identity unknown: Git is designed to accurately record the history of changes made to a codebase, including information about who made each change. When you make a commit, Git includes your name and email address in the commit metadata. This helps other contributors understand who made specific changes.
If you see a message from Git saying "author identity unknown", it means Git hasn't been properly configured with your name and email. This typically happens when you try to commit before you've told Git who you are.
Here's how you can set your identity in Git:
Setting Your Name: You can tell Git your name with the git config command. This command lets you configure Git's settings. To set your name, you would type:
Be sure to replace "Your Name" with your actual name.
Setting Your Email: Similarly, you can set your email with the git config command:
Again, replace "your.email@example.com" with your actual email address.
These git config commands store your name and email in Git's global configuration, which means Git will use this information for all projects on your computer. If you want to use different information for a specific project, you can remove the --global option and run the commands while inside that project's directory.
After running these commands, future commits will include the name and email you provided. You won't see the "author identity unknown" message again unless you try to commit from a different computer that hasn't been configured with your name and email.

Link your local repository to the remote repository: Before you can push your changes to the remote repository, you need to tell Git where the repository is. This is done using the 'git remote add' command:
Replace '[URL-of-your-remote-repository]' with the actual URL of your remote repository. You can find this URL on the main page of your repository on GitHub or any other Git-based platform you're using.
Wait...what? SSH ? Who dis ?
Usually, when you want to make changes to your project stored on GitHub, you need to prove it's really you by typing in your username and password each time. This can be a little annoying if you're making changes often. So, to make this easier, we're going to teach GitHub to recognize your computer, so you won't have to enter your password each time.
To do this, we're going to create a special "key" on your computer. You can think of this key as a secret handshake that your computer and GitHub understand. Once this key is created, we'll give a copy of it to GitHub.
Then, the next time your computer talks to GitHub, it will use this special key. GitHub will recognize the key and say, "Ah, I know you! You're allowed to make changes without typing in the password". And just like that, you won't have to authenticate each time you want to modify your project.
1. Open Git Bash
2. Paste the text below, substituting in your GitHub email address.
This creates a new SSH key, using the provided email as a label.
When you're prompted to "Enter a file in which to save the key", you can press Enter to accept the default file location. Please note that if you created SSH keys previously, ssh-keygen may ask you to rewrite another key, in which case we recommend creating a custom-named SSH key. To do so, type the default file location and replace id_ssh_keyname with your custom key name.
Push your changes to the remote repository: Now that your local repository knows where your remote repository is, you can push your changes:
Your project is now on GitHub, well done!


Member discussion