After setting up a fresh Ubuntu install in production with Digital Ocean, it is important to make your new environment extra secure and resilient. The goal is to optimize your installation for scale. In addition to staying up to date, you can follow a few steps that will make your entire server rock on! We are starting with MySQL and what to do when you don't remember your root password, especially when you use the pre-made Ghost image.
You are no exception to the rule, remembering passwords can be complicated. It is often said that memory is fleeting, so you might as well be equipped when you need to find or change a password.
During an automated installation like Ghost on a Digital Ocean server, you probably missed the step concerning MySQL. At least, you may have missed the choice of a password. Here's how to reset it on your Ubuntu 20.04 environment in just a few steps.

First of all, we assume that you are using Ubuntu. This is the Linux distribution with which the Ghost pre-installation works on Digital Ocean.
Step 1: Verify MySQL Version
This article contains the solution to change your password under Ubuntu 20.04. It is important to make sure that your server is running version 8 of MySQL (or higher). To be sure, here is the command :
You should have an output similar to the following :

Step 2: Skip Grant Tables
Normally, if you try to log in with MySQL but you don't know the root password, you will get an error :
The outpout of this command should look like something similar as follow :
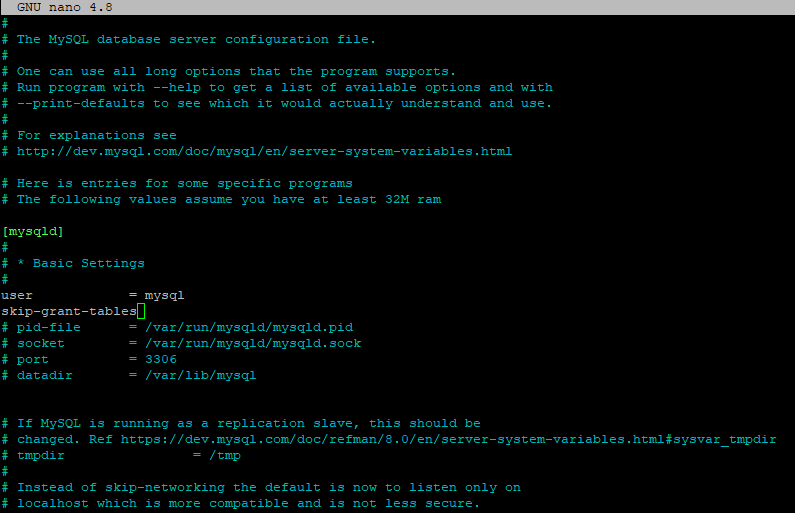
Thus, the system will have to start without granting the tables and this is only possible if you edit the mysqld.cnf in consequence.
Find mysqld section and add skip-grant-table to the file and then save it. We usually like to use the nano command but if you'd rather go with the vi command, we won't blame you at all!

Ready for the next step? It's now time to start the process that will help you resetting the password.

Step 3: Restart MySQL Server
To apply the changes, the service must be restarted using the command below :
Then, you can enter to the database with password using the command as follow :

Step 4: Reset Root Password
Now, flush the privileges first. Run the following command:
Select the MySQL database. Run the following command:
And set the new password for the root user, run the following command:
At the place of (YOUR NEW PASSWORD) provide your new password. After successfully changing the MySQL root password, log out from the MySQL shell.

Step 5: MySQL Processes & Service
Thus, you will have to kill all the processes of MySQL before even restarting the MySQL server.
And the restart the MySQL service, run the following command:
Finally, the root can connect to MySQL again using the new password. It is time to improve your database and how your server is dealing with data. If you want to start by fixing Memory and CPU issues with Swap Space, follow this link.
Don't forget to keep your ghost installation up to date. Whenever running a public-facing production web server it’s critically important to keep all software up to date. If you don’t keep everything up to date, you place your site and your server at risk of numerous potential exploits and hacks.


